1. I wanted a rather large grimoire, nothing typical or this whole process would have been a lot easier. Either way, I found paper that was 11"x17" and I trimmed it to 11"x14" with a paper cutter. If you're doing this by hand, it will take quite a long time. As it is, cutting 300 sheets took about 20 minutes with a cutter.
2. After cutting the sheets to the size I wanted, I created a nice herbal concoction in water. It included sea salt, jasmine, coffee (for effect) etc. It steeped for a bit and got a good murky color. I proceeded to dunk each page, individually, into the solution.
4. After, I got about 10-15 in at a time, I pulled them out and left them in my pantry to dry. I put them in my pantry because it was out of the way, dry, had a fan, and I had a lot of surface. It took about four days to dry, because their size was so large and I didn't have enough space to lay out each page. I had to group them out. Ideally, I would have liked to air dry them outside but it was pretty humid and I didn't have a laundry line. So, take advantage if you have one :) It'll happen quicken :)
NOTE! Just from moving the pages into the water and back and forth to dry, they crumpled a bit and got uneven edges. I did not create this, it just happened and I was quite pleased with it :)
5. Afterward, I punched eight holes into each of the pages. I also grabbed a group of paper and added eyelets to four main holes for support. You do not have to do this, I just did this again because it was 300 11x14" pages. lol. This created nine sub groups of paper.
6. So I took heavy duty cotton string and thread it through the holes to string it together. Then I strung string through the remaining 3 main groups of the book together.
7. And you end up with something like this
8. So I taped up the binding of the book, ya know where all the holes and string are to just further support it. I also taped down some hard cardstock to support the front page (which will be covered) and the last page (which will be covered).
9. I then found 3 pieces of heavy duty cardboard, measured them around the pages and cut them to fit. Here I'm testing their size.

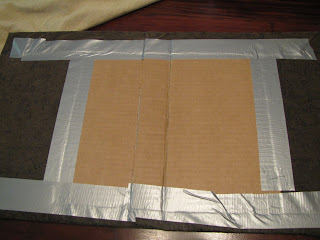
10. I found the fabric that I wanted, laid it face down and placed the cardboard on top. Cut around it, and then taped it to the cardboard, like so.
Don't worry this will all be covered in the end. So I taped it down like so.. and underneath used super awesome double-sided tape. I forget what it's called, but it's in the scrapbooking aisle of any craft store and it's in a red wheel.
11. I then placed the pages inside again (I realize this is the same picture as earlier, just imagine the fabric taped down to the inside of it like in the last picture.) You're going to take a large sheet of paper or fabric and glue/tape down the inside cover to the reinforced first sheet. Do the side to the back.
12. To decorate the front I bought little scrapbooking embellishments and pierced it through the cover to give it a bit of awesomeness. :) I'm still working on the rest of the decorations for the front and some sort of locking system :P


